
In the world of industrial and automotive sealing, weatherstripping adhesives play a critical role in ensuring airtight and watertight sealing performance. But over time, adhesive failure may occur—causing noise, air or water leaks, and ultimately reducing the effectiveness of the sealing strip.
In this blog, we’ll guide you through:
- Common types of weatherstripping adhesives
- Signs and causes of adhesive failure
- Step-by-step process to remove old adhesives
- Best practices for new sealant application
- Pro tips from OKIN – Your rubber sealing expert
🔖 What Kind of Adhesives Are Used for Weatherstripping?
Depending on the application environment and material of the sealing strip, adhesives may vary. Below are the most commonly used ones:
- Acrylic Adhesive – Strong, UV-resistant, widely used in construction and automotive.
- Silicone Adhesive – Weather and temperature resistant, ideal for outdoor or high-temp areas.
- Rubber-Based Adhesive – Excellent flexibility and peel strength, ideal for flexible substrates.
- Heat-Activated Adhesive – Requires temperature control; often used in manufacturing processes.
❗ How Do You Know Adhesive Is Failing?
Several signs may indicate weatherstripping adhesive failure:
- Unusual Wind Noise: You may hear more outside wind or road noise.
- Light Leakage: Light entering through window or door edges.
- Seal Strip Shifting: The rubber strip detaches or shifts when opening/closing.
- Water Seepage: Moisture, damp carpet, or visible water leaks near seals.
❗ Why Adhesive Fails: 4 Key Causes
1. Contaminated Surface
Dirt, grease, or oil on the surface can prevent bonding.
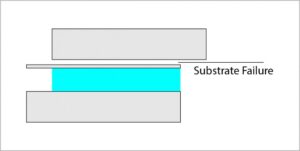
2. Incompatible Substrate
Some materials, like plastics with plasticizers, can resist adhesives.
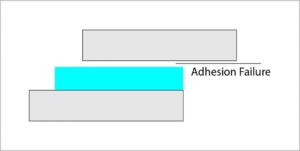
3. Improper Application
Using too much, too little, or uneven adhesive may lead to poor bonding.
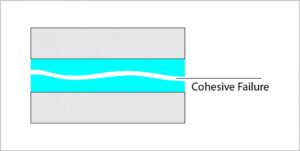
- Environmental Factors
High humidity, extreme heat, or chemical exposure can degrade adhesives.
🛠️ How to Remove Old Adhesive Properly
If your adhesive has failed, follow these steps before reapplying new weatherstripping:
Step 1: Remove the Seal Strip
- Use a trim removal tool or a plastic scraper.
- Peel slowly and carefully to avoid damaging the substrate surface.
Step 2: Remove Old Adhesive
There are three common methods to effectively remove leftover adhesive:
- 🔥 Heat: Apply a heat gun to soften dried adhesive, making it easier to peel off.
- 🧽 Tools: Use a plastic scraper or rubber putty knife to scrape off softened glue without scratching the surface.
- 💧 Solvent: Use a professional adhesive remover. It breaks down the glue into a less sticky substance that can be wiped off.
⚠️ Note: Some solvents may damage paint surfaces. Always test on a small area first.
Step 3: Surface Preparation
- Clean the area with isopropyl alcohol or a residue-free cleaner.
- Make sure the surface is completely dry, clean, and free of dust or grease before applying new adhesive.
✅ OKIN Pro Tips for Better Bonding
- Choose the right adhesive based on temperature, humidity, and material compatibility.
- Apply even pressure when installing the new strip.
- Avoid stretching the seal strip during application.
- Let the adhesive cure fully (at least 24 hrs) before use.
📞 Final Thought – Consult the Experts
Replacing or re-gluing weatherstripping may seem simple, but choosing the right adhesive and ensuring proper installation is critical for long-term performance.
At Okin, we offer:
- Custom weatherstripping solutions
- Adhesive recommendations based on material and usage
- Technical support for installation and bonding