
Why the Right Door Seal Strip Matters
- Energy Savings
Superior weather stripping stops air leaks around doors, reducing heating and cooling loads by up to 15%. Over a year, that can translate into significant utility cost reductions. - Enhanced Comfort
By eliminating drafts and cold spots, properly sealed doors maintain a consistent indoor temperature, improving occupant comfort in both summer and winter. - Noise Reduction
Quality rubber seal strips and EPDM gaskets absorb and block external noise, creating a quieter indoor environment—valuable for homes, offices, and recording studios. - Dust, Insect & Moisture Barrier
Seals prevent dust, pollen, insects, and water intrusion. This helps protect interior finishes, electronics, and stored goods from damage. - Extended Door & Frame Life
Cushioning provided by seal strips reduces wear on door edges and frames, preventing chipping, warping, or paint damage over time.
Installation Locations & Selection Tips
Understanding where air or moisture can penetrate is critical. Select seal types tailored for each location:
| Location | Seal Type | Key Features & Benefits |
| Door Jambs | V‑strip (tension seal), Felt | Easy to install along vertical jambs; flexible to varying gap widths; low cost. |
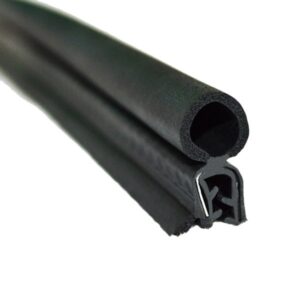
| Hinge Edge | Tubular rubber or vinyl | High compression recovery; resists wear from hinge movement; long-lasting seal. |
| Threshold / Bottom | Brush sweep, Flat sweep | Blocks drafts, dust, insects; brush adapts to uneven floors; flat strip gives tight seal. |
| Electrical Cabinets | EPDM foam, Silicone gasket | Excellent anti-aging, corrosion resistance; insulates against moisture and contaminants. |
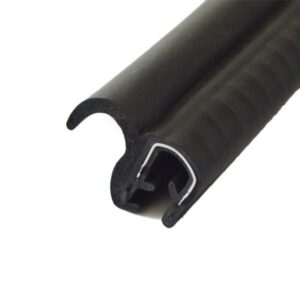
| Shower Door Tracks | P‑seal, T‑top strip | Waterproof design; resists mold and mildew; snaps easily onto glass or track. |
Tip: Always measure the gap width at multiple points (top, middle, bottom) and subtract 2–3 mm to ensure the seal compresses properly without binding.
In‑Depth Material Comparison
Choosing the right material affects lifespan, performance, and cost:
| Material | Features | Expected Life | Typical Applications |
| Felt | Soft, easy to cut, low initial cost; moderate sealing ability | 1–2 years | Interior doors, cabinets, non‑critical seals |
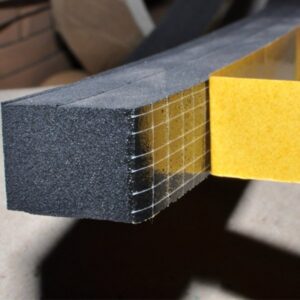
| EPDM Rubber | UV/ozone resistant; wide temperature range (–45 °C to 160 °C); high resilience | 5–10 years | Exterior doors, windows, automotive seals, industrial enclosures |
| PVC / TPE | Economical; good corrosion and chemical resistance; moderate flexibility | 3–5 years | General‑purpose sealing, budget installations |
| Silicone | Excellent high‑temperature tolerance; food‑grade options; mildew‑proof | 5–7 years | Food industry cabinets, medical enclosures, high‑heat areas |
| Metal (Aluminum / Stainless Steel) | Rigid, heavy‑duty; extreme environment durability | 10+ years | Industrial doors, clean rooms, high‑traffic entryways |
- EPDM vs. PVC: EPDM offers superior longevity and weather resistance, making it ideal for exterior applications. PVC is cost‑effective for non‑critical, indoor uses.
- Silicone: Use where temperature extremes or hygiene standards demand non‑porous, mildew‑resistant seals.
- Metal: Choose for maximum durability where plastic or rubber would degrade under mechanical stress or chemical exposure.
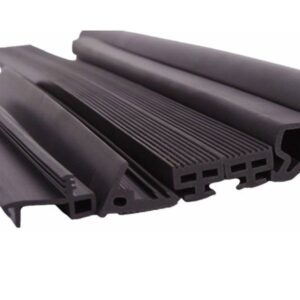
Common Door Seal Strip Profiles
Different cross‑section profiles serve distinct functions:
| Profile Shape | Description | Best Use Case |
| Bulb & Socket | Round “bulb” compresses into a matching groove | High‑compression exterior doors |
| D‑shape | Semi‑circular seal on flat mounting base | Garage doors, warehouse doors |
| P‑shape | Flat base with protruding lip (“P”) | Shower doors, sliding glass assemblies |
| Edge trim | U‑channel grips onto door edge | Decorative trims, weather seals |
| Brush | Nylon bristles attached to flange | Uneven thresholds, dust control |
Select a profile that matches your gap geometry and desired compression.
Step‑by‑Step Installation Guide
- Clean Surface:
Remove old seal, dirt, and adhesive residue. Ensure surface is dry and smooth. - Measure & Cut:
Measure length needed, subtract 2–3 mm for compression. Use sharp scissors or utility knife. - Dry‑Fit First:
Position seal without adhesive to confirm fit and profile alignment. - Apply Adhesive (if needed):
Many strips come with peel‑and‑stick backing. For loose types, use silicone‑based adhesive or double‑sided tape. - Press & Secure:
Firmly press along entire length. For tubular or bulb seals, snap into groove or channel. - Test Seal:
Close door and check for light or air leaks. Adjust or trim as necessary.
Maintenance & Troubleshooting
- Regular Inspection: Check seals every 6 months for cracks, flattening, or detachment.
- Cleaning: Wipe rubber and PVC seals with mild soap solution; avoid petroleum‑based cleaners.
- Re‑Lubrication: Apply silicone spray to restore flexibility and prevent sticking.
- Replacement Indicators: Visible gaps, excessive drafts, water ingress, or noise intrusion signal it’s time for new weather stripping.
FAQ
Q1: How do I know which seal thickness to choose?
A: Measure your largest gap when the door is closed; choose a seal rated for that gap minus 2 mm compression allowance.
Q2: Can I install seal strips myself?
A: Yes—most V‑strips and adhesive-backed sweeps are DIY‑friendly. For co‑extruded or metal channels, professional fitting may be advised.
Q3: Are flame‑retardant seals available?
A: EPDM and silicone options can be specified with UL94 V‑0 rating for high fire resistance.
Q4: What’s the difference between single extrusion and co‑extrusion profiles?
A: Single extrusion uses one material; co‑extrusion combines layers (e.g., hard base + soft sealing lip) for enhanced performance.
Contact Us
Request free samples and expert guidance on selecting the perfect door seal strip for your application!