
Introduction
Auto weather strip is the key component for cabin quietness and for blocking wind, rain, and dust. Although replacement is typically every 20 years, regular inspection and timely repair are essential to prolong its service life.
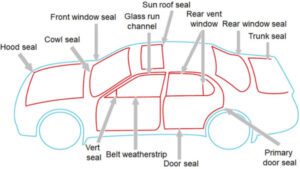
Positions & Types
- Door Seals: Prevent water and dust ingress at door gaps.
- Window Seals: Six sub‑types—roof rail, vent, beltline, channel, front, and rear.
- Hood & Trunk Seals: Protect engine bay and trunk from external elements.
- Cowl Seals: Block fumes and debris at the firewall gap.
- Sunroof Seals (if equipped): Ensure watertight sunroof installation.
Common Defect Symptoms
| Symptom | Cause | Effect |
| Noise/Whistle | Poor seal fit | Increased cabin noise |
| Water Leaks | Cracks or adhesive failure | Damp interior, mold risk |
| Temperature Drift | Air leakage | HVAC overload, reduced efficiency |
| Cracks & Stiffness | Rubber aging | Loss of elasticity, seal failure |
DIY Replacement Steps
Step 1: Remove The Old Strips
-
Start by gently prying the old seal away from its channel using a flat screwdriver or better, a plastic trim removal tool.
-
To avoid scratching the paint, slip a thin plastic shim between the tool and the bodywork. Work slowly around the entire length—the strip should lift out cleanly without tearing.
- Remove all rubber fragments so the surface is clear.
Step 2: Clean & Sand
- Spray automotive adhesive remover; Wait 2~3 mins and wipe with a lint‑free cloth until old glue is fade away.
- Use 400 to 600 grit sandpaper to polish the metal frame, removing rust and residues to make the surface smooth.
- Wipe away dust with a clean paper.
Step 3: Dry‑Fit New Seal
- Place the new seal in position without adhesive, align edges, and trim ends to overlap by about 5 mm.
- Mark start and end points with a pencil for accurate final placement.
Step 4: Apply Adhesive
- Use high‑quality automotive urethane sealant; apply a 2–3 mm bead to both the metal frame and seal base.
- Ensure the bead is continuous—gaps will cause leaks.
Step 5: Wait for Tack Stage
- Let adhesive sit for 5–7 minutes until surface is tacky but not wet.
- Test by lightly touching: it should lift without smearing.
Step 6: Install New Seal
- Starting at one corner, press the seal into place along the frame, working slowly.
- Every 5–7 cm, press firmly with your fingers or a roller to eliminate gaps.
Step 7: Secure Ends & Joints
- Overlap ends by about 5 mm; apply extra sealant at the joint.
- Use a plastic spatula to smooth out the joints to prevent water from accumulating.
Step 8: Clean Excess Adhesive
- Before the overflow material solidifies, immediately use a bonding remover and a cloth to wipe off it.
Step 9: Curing Time
- Allow adhesive to cure at ambient temperature (20–25 °C) for 1–2 hours.
- Avoid stress or washing during curing to ensure strong bond.
Step 10: Final Inspection & Test
- Slide your fingers along the sealed edge to detect any loose spots.
- Perform a water test—— spray water on the seal and check if there is any leakage inside.
Why Choose OKIN?
- Twenty‑one extrusion lines (6 co‑extrusion, 3 foam, 7 angle‑jointing machines) ensure capacity and consistency.
- Premium materials with high rubber content, steel reinforcement, and excellent resilience.
- Global reach serving Southeast Asia, Northern Europe, Middle East, Europe, and North America.
- Expert support from pre‑sale material selection to post‑sale technical guidance.
Contact Okin Rubber today for free samples and professional installation guidance to keep your vehicle perfectly sealed!